
Free PDF Pattern is now available for download. Click here!
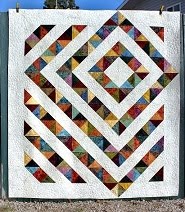
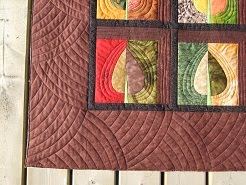
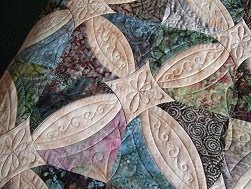
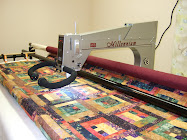
I have had this quilt in the works for a few months and finally got to quilt it this week. When I loaded it on my machine I was planning on doing a panto but it kept nagging at me that it deserved some custom work so I gave in! :) Large pebbles and swirls it was! I had made the blocks at a guild UFO day and had a few guild members help me decide on the finally layout as there are so many options when playing with HST style blocks. I really like how the blocks are worked into the border and glad my friends suggested it! :)


I used soft yellow So Fine thread for the background quilting and a light brown Lava thread on the dark batiks. Batting is Quilter’s Dream Blend.


I used a Stonehenge extra wide backing.

I thought I would share how I made the blocks as I didn’t use a pattern but used a technique that I saw on a Missouri Quilt Company YouTube video that you can see here on how to make quick HST blocks. But instead of using just two fabrics from a charm pack I resized it and replaced one of the fabrics with a Four Patch made with 5” charm squares and that turns out to be 9 1/2” square.

Once I had the four patch sewn I cut a 9 1/2” square of my background fabric and layered them right sides together and sewed a 1/4” seam around the outside perimeter.


Then I cut the block diagonally twice.

Then press open the four sections ( to the dark side) and end up with four HST blocks. Trim blocks, if needed, to 6 1/4" square.


Now the only down side to these blocks are they are all bias edges so you have to be very careful when sewing the blocks together that you don’t stretch them out of shape! When adding the border cut 6 1/4" strips WOF of the background and piece in the two corner blocks that extend the design into the border. DO NOT piece white and white HST in the border as that would put bias edges on the outside edge. I have had a few readers do this and that makes for a very unstable outside edge. So if you have a few charm packs sitting around and want make a fast and easy quilt why not give this a try! I used 3 charm packs and my quilt finished 63 3/4"x 69 1/2", that includes the 6 1/4" border. I used about 3m of background/border/binding fabric for this size.


This is a striking, yet simple design, love it! And, your quilting is dead on perfect for it.
ReplyDeleteI'm eyeing my charm pack collection now....
Oh, I love love love this layout. Gotta try this. And the quilting design is just perfect. Thanks for sharing.
ReplyDeleteI second that comment! So inspiring. Thank you so much for sharing.
DeleteAgain a beautiful quilt with gourgeous quilting!
ReplyDeleteThanks for sharing your idea with the four charm pack squares for one big square!
ReplyDeleteYour quilt looks fantastic and your quilting is great on it.
Saskia
Thank you for sharing. It is a very smart looking quilt. Quilting as always superb.
ReplyDeleteKathy that is a fabulous quilt. Thank you for the tutorial, that is such a clever way to make those blocks
ReplyDeletethis is such a pretty quilt Kathy....I love your quilting
ReplyDeleteBeautiful! Love the layout!
ReplyDeleteI love everything about this, the colour, the quick method, the quilting but best of all I like the layout. So cool and modern! Do you think one day you might add a Pinterest button to your photos - please!!
ReplyDeleteThis is a fun technique, and your friends' idea to carry the pattern into the border was inspired. And then your custom quilting is the cherry on top! What a great quilt. Thanks for the inspiration!
ReplyDeleteAren't you clever! Love the quilt and thanks for the quick tutorial.
ReplyDeleteSo glad you didn't do an E2E on this one, it was worth the extra time!!
ReplyDeleteTodella ihastuttava peitto ja kaunis tikkaus! Kiitos ohjeesta.
ReplyDeleteLove it! And a great tutorial too--another chance for me to use up my nickels!
ReplyDeleteI love everything about this quilt, what an awesome job!!
ReplyDeleteGreat tutorial on those HSTs, and the quilt is wonderful, love the way you placed the design. Carole @ From My Carolina Home
ReplyDeleteNow I think I need to buy some charm packs... but wait I will have quite a few left overs from my present quilt. Problem solved!
ReplyDeleteLove your quilt, and the quilting looks so great! Glad you reconsidered the pattern and did custom quilting! Wish you a great weekend and hope you will have a great time doing something for you :-)
ReplyDeleteWow what a stunning quilt. The quilting is spectacular.
ReplyDeleteJust fabulous and the quilting is perfect for it.
ReplyDeletenever thought of that technique with a 4-patch. Cool!
ReplyDeleteWhen you say you used 2.5m background fabric...do you mean yards?
ReplyDeleteNope, 'm' mean Metres! I'm Canadian. :)
DeleteThanks I wondered because some measurements were inches! What color way is your charm pack? Beautiful quilt!
ReplyDeleteI buy fabric in metric and make quilts using imperial measure! So I use both! I don't know the name of the batik charm packs, it was part of a kit that I never made and there were no labels on them.
DeleteI can handle putting the top together but it's the quilting that to my eye is nothing short uf magical & I definitely need help with that! Beyond showing my screenshot to someone with a longarm, any suggestions?
DeleteMy friend asks what fabric line that charm pack was from? I like the colors too but thought I'd try the idea from my stash.....yeah, right!
ReplyDeleteI really love this, and plan to make one of my own! Thanks so much for sharing!
ReplyDeleteStunning quilt. I had started one similar last year for my BIL but didn't get very far. I like your quilt much better so I'll have to make one. Thanks for sharing. I am going on a retreat and I think this would be something to take with me.
ReplyDeleteDo you think you could give us some instruction on cutting, layout, and sewing. This quilt is striking!
ReplyDeleteWOW!!! What a beautiful quilt!! I am in love with your quilting! Thank you so much for sharing all the information about this quilt, even down to the thread choices. You are amazing and gifted. You made my day!
ReplyDeleteWonderful use and adaptation of a MSQ tutorial. This is simply a beautiful quilt pattern. Love your choice of colors.
ReplyDeleteLove the quick-it-up modification and your fmqing! Most excellent.
ReplyDeleteBeautiful quilt and a great job with the quilting design.
ReplyDeleteYou should send this idea to MSQC and let them do a tutorial. So pretty!
ReplyDeleteThis quilt is a beauty, love the colors and the quilting, you did a great job on the quilting design, thanks for the tutorial, really interesting,
ReplyDeleteI LOVE the lay out rolling into the boarders and the asymmetry of it. would like to resize it for a crib size...any suggestions?
ReplyDeleteI guess the only way to make it crib size would be to use smaller squares in the four patch. Instead of 5" charms try 3" squares with 5 1/2" background squares.
DeleteWould using a layer cake and then cutting work? I did that for making the pin wheels that Jenny showed using this method and they came out about 2 1/4" blocks, may work if you cut it differently???
DeleteThanks for sharing this wonderful quilt and your short cuts, great idea with outstanding results.....love it :)
ReplyDeleteMerci pour ce tutorial excellent ! J'aime beaucoup le rendu et le matelassage est magnifique !!! Bravos !
ReplyDeleteThis comment has been removed by the author.
ReplyDeleteSilly me, I asked how many charm packs you used, but it is said there already :) Beautiful quilt and genious technique!
ReplyDeleteHello. I have a question. Did you leave the HST 6.5 inch? Did you make the quilt pictured with squares that large? I just tried your technique and like it very much. But the squares are huge.
ReplyDeleteThank you.
I went ahead and made this as a mini quilt. Used 2.5 mini charms. Sized the 4 patch square to 2.75. Turned out great.
DeleteBeautiful Quilt........thank you for the tutorial. The Quilting is stunning!!
ReplyDeleteBarb
Also from Manitoba
Beautiful quilt. Would love to see directions for the layout.
ReplyDeleteSmart folks think alike :-)
ReplyDeleteI thought of the exactly same thing. I wrote a tutorial on my blog in April, 2014. I have also included several layouts for these 4-patch HSTs. Take a look here
http://sewpreetiquilts.blogspot.com/2014/04/four-patch-hst-boston-block-tutorial.html
Hi,
ReplyDeleteYour work is absolutely stunning! I have a quilt called "Sea Glass" that I am getting ready to long arm and have been thinking of doing a pebbles and swirl design. Yours has absolutely inspired me. You are a very talented and skilled longarmer!
I really love this quilt and wish I could down load it too my files I can't wait to try it
ReplyDeleteVery excited about this one. I have a to do list as long as my arm. But this one may jump to the top!
ReplyDeletecant get it to layout like yours sooooooooo mixed up
ReplyDeleteWow. That is sssooo beautiful. I would love to have this quilt.
ReplyDeleteI have to try and make this quilt! gorgeous!!!
ReplyDeleteMy son loves this quilt but is asking if it would work with a light colors on a dark background. What do you think?
ReplyDeleteYes I have seen it made with a dark navy background and colouful fabrics for the four patches. It looks great!
DeleteNow that I've seen an easier way to do this, I want to try it! Yours is the prettiest I've seen. Your quilting sets it off, and I love your choice of fabrics!
ReplyDeleteLove this. Just wondering if there is an easy calculation for a king size quilt. My son would love this.
ReplyDeleteMade it!!! Needed a 'man quilt' that personified "sound" and there was your pattern calling to me! Thank you!
ReplyDeleteHi Kathy, how do you bind it without cutting of the points of the 3 triangles that go to the edge? Thank you!
ReplyDeleteI LOVE this pattern! I downloaded it a while back and am just making it now for someone in my family. Their favourite colours did not include any white or greys at all so I am doing a black background. It is going to be stunning I think! This pattern is truly so versatile!
ReplyDeleteYour quilting is awesome as always! You are truly a gifted person.
This comment has been removed by the author.
ReplyDeleteThanks so much for sharing your pattern and great tips! I am making a crib quilt.
ReplyDeleteI started today !! I really love all the tutoríal.I am making mine with shirts of a dear friend who pass away. Thank you verry much for your help
ReplyDeleteBeautiful could this be turned into a King size?
ReplyDelete