

I have been asked by a few of my reader if I could do a post on how I photograph my quilts. I need to stress that I am not a photographer, I just enjoy taking pictures and have discovered a few tricks in the last few years on how to capture the quilting on quilts. So in this post I am going to share these tricks and tips for taking good quilt pictures.
Lighting
To get a good picture of a quilt you need to place it in light that will create shadows on the quilting lines.
I prefer to take pictures outdoors using natural light but you can take good pictures indoors too. The picture above was taken indoors using indirect light from the window. I turn all overhead lights off if the quilt is laying on a bed or floor. I avoid direct light like a sunbeam as the light is too harsh.
When taking pictures outdoors take note of the position of the sun, it is low on the horizon or high over head. You want to lay or hang your quilt so the sun shines across it not straight onto it. For example when I lay my quilts on the dock I do that in the early morning when the sun is low but by the afternoon when the sun is high in the sky I hanging them on the clothes line to show the quilting better.
Here are examples of pictures taken in the morning, you can see the quilting very well when it is flat on the ground...

...but when on the clothes line, which faces south, the quilting is not as noticeable as the sun is shining straight onto the quilt. The below picture is still a good pictures as it is taken square on and shows the whole quilt well. So the sun isn't the only consideration, it depending on what you want to highlight in your photo.

When taking pictures outdoors a slightly overcast day is the best time to take quilt pictures.
Here is an example of my Giant Dahlia quilt in the snow.

Perspective
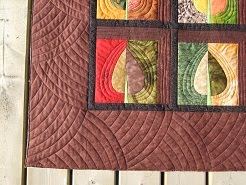
The best way to take a picture of a whole quilt is to take it straight on like in the picture above and below. There pictures are more about the piecing rather than capturing the quilting. Having a place to hang your quilts for pictures like on a clothes-line or the railing of a deck is ideal.

When you are take pictures of quilts on the ground there are a few ways you can approach this. One is to take the pictures when standing at the bottom of it like in the picture below but your not getting a square image of the quilt from this perspective. They look nice but this is were you can play with angles as you don't always look at something on the table or ground straight on.

A trick I like to do is twist the photo like this.

This give the illusion that the quilt image is square and looks more natural as you don't always look at objects square on. You may have noticed I do this a lot with my pictures when they are on the ground. I do not do this when I have the quilts hanging as that perspective would like I am looking at the quilt with my head tilted to one side and that is not normally how I look at quilts. :)
Lighting Issues
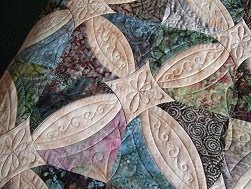
The two above photos were taking in the afternoon so you can't see the quilting as well as the sun is shining directly down onto it but you can see in this next picture that I found a spot for a quilt that really highlights the quilting but almost to the point of highlighting it too much as you can't see the piecing well.


Lighting Issues
The two above photos were taking in the afternoon so you can't see the quilting as well as the sun is shining directly down onto it but you can see in this next picture that I found a spot for a quilt that really highlights the quilting but almost to the point of highlighting it too much as you can't see the piecing well.

And here the opposite problem....too much direct light that washes out the color and you can't see the quilting that well.

So it is good to just try a few spots facing different directions and see if hanging or laying the quilt down will give you the best results.
Background
Now to make a quilt picture a bit more interesting it is good to have an great backdrop. That can be a tree, grass, rocks, water, snow, ice, etc, but it should create a good contrast as well as pick up colors from the quilt.


If you can't use your yard then find a spot in the house that has good natural lighting. I have two spots that I use that usually give me good results when it is bright out.
One is my bedroom as the window faces east and it gets the morning light. Once the sunbeam no longer shining though the window I am ready to take pictures.


The second spot is on a bench in the living room below the window that faces east. I also like to make sure I get a bit of the edge of the bench to give the picture depth with the dark shadow.

I use a very basic digital camera, nothing fancy. It's a Fugifilm FinePix and I have always been happy with the quality of picture it takes and I never use the flash when taking pictures of quilts. I take A LOT of pictures of my clients quilts and then just save the ones that show the quilting, true color and have an interesting composition. I always delete blurry pictures. Take your time to make sure you understand how your camera works and experiment with different setting to see what works best with your camera.
So that's about it, I hope this is what my readers were asking for and that the next time you are taking pictures of your quilts you are able to use a few of this tips to create wonderful quilting pictures!
If you have any photo tips you would like to share please feel free to add them in the comments as I would also love to learn new tricks too!


thank you Kathy! great tips and i sure could use them!!
ReplyDeleteSuperb tips...thank you so much for sharing your tips. I am going outside to scout some new locations. Your photos are so good....one of the first things I noticed about your blog. Thanks again.
ReplyDeleteVery good tips Kathy. This is very timely as I was going to insist on a private lesson when you come to visit next week! I think I still will.
ReplyDeleteThank you Kathy, your photos are always great and your quilting is always an inspiration to me.
ReplyDeleteGreat post. Thank you Kathy
ReplyDeleteNice advice. I'm struggling with making pictures of bigger quilts.
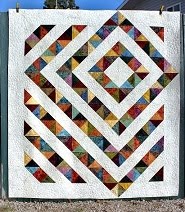
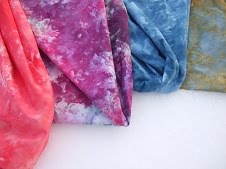
ReplyDeleteThanks Kathy for sharing. Love your quilting - always so perfect for the design of the quilt. Love that batik quilt(the first one on this post) with the pale colour 'melons' and diamonds. Do you remember what pattern it was?
ReplyDeleteThanks
Jen
Jen, that is my Winner's Bouquet quilt and you can see that post here
ReplyDeletehttp://tamarackshack.blogspot.ca/2010/12/winners-bouquet.html
Good info...thanks for your tips...always love your photos.
ReplyDeleteVery interesting post. It was good to see in the pictures the difference the lighting makes.
ReplyDeleteExcellent tutorial!!! But can you still come to NY and take my pictures for me??
ReplyDeleteKaren
I LOVE your blog, you're pics, the quilts, all of it is just breathtaking! Thank you so much for sharing your talents :)
ReplyDeleteKathy, One thing I've always liked about your blog is the beautiful pictures, thank you for sharing some of your tips.
ReplyDeleteThank's for sharing tips...
ReplyDeleteI always find it difficult to take pictures that will show all detailes.
You live in a beautifull place.
Have a nice week.
Kathy , thank you so much. I was one of the people nagging you for this tutorial. It has really encouraged me knowing that you use a basic digital camera and are able to get such wonderful results with it I now feel like I have a place to start.
ReplyDeleteGinka
Thanks for the tips, I had never found tips on how to photograph quilts until now.
ReplyDeleteThanks for the tips. Will try that with my latest quilt. Very hard to see the quilting with the light thread. Really liked Jenny's swirly pattern. So fast and easy. Hopefully my feathers don't look too much like fat sausages:)
ReplyDeleteExcellent tutorial. Thanks. My husband does a pretty good job for me, but always looking for more ideas. We use one of his portrait background stands to hang the quilts. Works quite well.
ReplyDeleteThank you for these tips. Your quilting and photography are amazing.
ReplyDeleteOlá! Os seus trabalhos são lindos! Obrigada por mostrá-los!!! :)
ReplyDeleteKathy, it looks -- in some shots -- like you're using a stand of some sort and clip the quilts to the top to get them standing perpendicular to the ground (parallel to the camera) Is there a stand or just a tall person with some really great skills holding a quilt? :)
ReplyDeleteSarah
An Heirloom in the Making
In some of those shots its my husband holding a board that the quilt is clipped too. I know have a photography stand that my husband made an adapter for that I can hang quilts on when I am by myself!
Delete